Just so you all know, I LOVE my "soups" very thick. I don't like it all runny so if you aren't a fan of the really thick soups, you can always half the amount of noodles. Also, if you're wanting a recipe that is going to take you no time at all in the morning, you should cut up your vegetables the night before. I really like this recipe. It's pretty easy and it's absolutely delicious. Just imagine coming home on a cold winter's evening to a home that smells DELICIOUS and a nice warm dinner. It's fantastic.
Ingredients:
6 cups chicken broth
10.75 oz can cream of chicken soup
1/2 cup chopped onions
1/2 cup chopped celery
1/2 cup chopped carrots
16 oz can whole kennel corn, drained
1 bag (or 1/2 bag if you want your soup thin) egg noodles
3 medium pieces boneless, skinless chicken breasts
Steps:
1. Mix everything together in the slow cooker.
2. Cook on low for 6-8 hours, stirring occasionally.
3. Take chicken out and shred with forks. Return to slow cooker. Stir. Serve.
Saturday, March 3, 2018
Sunday, February 25, 2018
Review: The Original Pancake House
For Valentine's Day, we had the great pleasure of attending the soft opening of Normal's very first Original Pancake House. And it was great! I've been able to attend a couple different soft openings, and this was by far the best! The food was amazing. I mean, I've never had such a great omelet! I was so full after eating it. There were a couple hiccups: the main one being that our food didn't come out all at the same time. It didn't really matter to me, but for my husband, he's convinced that his meal would have been much better had it all come out at the same time. The potato pancakes just aren't that great in my opinion, but I'm sure with corned beef hash on top and some eggs on top, they taste much better. My build-your-own omelet with cheddar cheese, mushrooms, spinach, and bacon was amazing. And of course, the pancakes were great. But really, how do you screw up pancakes? And every employee we interacted with was very pleasant and helpful. Oh and the fresh squeezed orange juice is my definite go-to drink here from now on! They officially opened on Monday, February 19th, 2018. So if you get the pleasure of visiting, just know, you'll have a great experience in Normal, IL.
Saturday, February 24, 2018
Bacon & Beer Festival
So January 2nd, around 2:30 in the afternoon, I get a text from my husband with a link to an article in the local paper written about a new festival coming to town that features Bacon and Beer that will occur February 16th. Those two things are probably in my husband's top 10 favorite things in the world (along with our son and tacos, of course)! There wasn't a whole lot of information in this article besides that it's an event for 21 and over, will feature “thousands of pounds of bacon and more than 100 craft beers from local and national breweries”.
A base ticket was $30 in advance and $35 at the door and included:
– admission for 7pm-10pm
– Pint Glass
– all bacon and beer samples
A VIP ticket was $65 in advance and $70 at the door and included:
– admission for 6pm-10pm
– Pint Glass
– VIP gift (which ended up being a high-quality coaster with a built-in bottle opener)
– Exclusive BLT bar
– Exclusive Bloody Mary bar
– all bacon and beer samples
We also learned that there would be a bacon-eating contest, live music, related games, and awards for Best Bacon Dish and Best Brewery.
One thing I thought was an amazing idea that I haven't seen any other beer festival in town implement was a discounted (around half price) designated driver ticket for people that wanted to come and just sample bacon. I think all the other festivals should take note and follow suit!
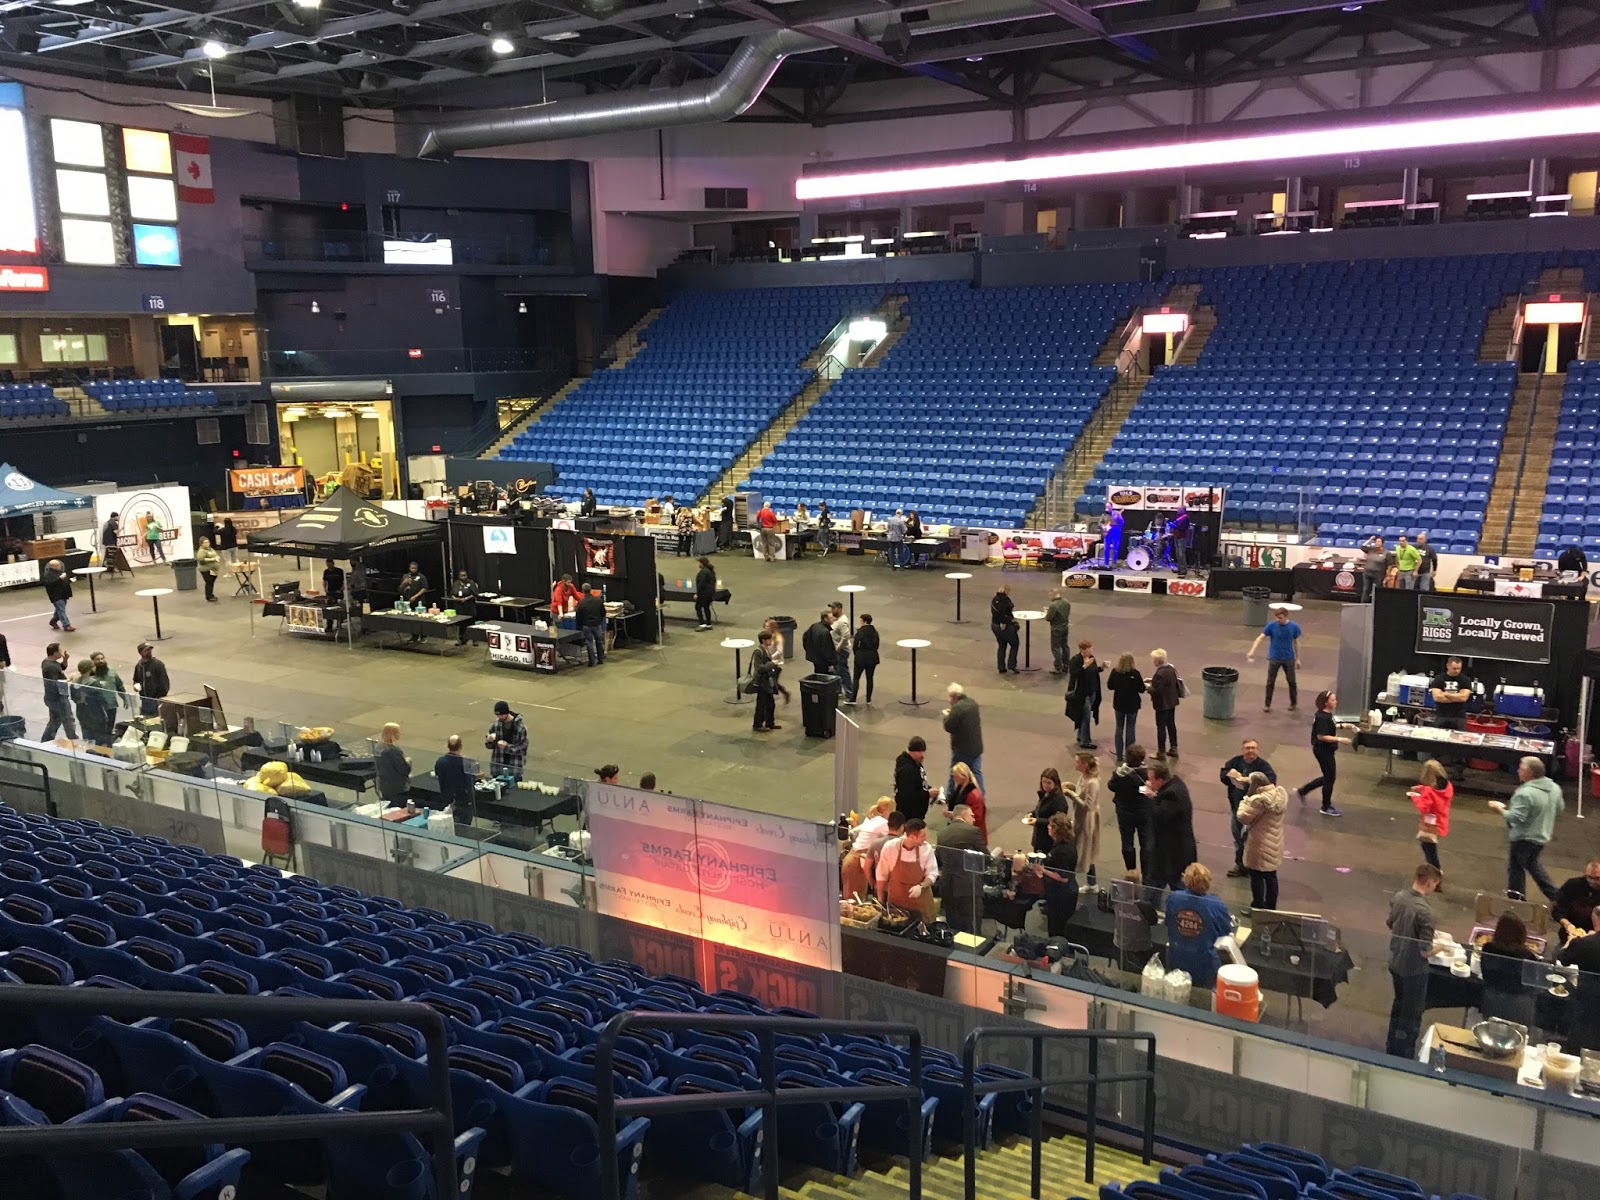
Here's how the festival went!
I decided to buy two VIP tickets for my husband and myself and surprise him with them as a Valentine's present. He was so excited because I made him think that we weren't going. They definitely weren't cheap. I ended up spending $154.10 after fees and taxes. I was able to get our tickets on my phone with the Ticketmaster app.
Since we got the VIP tickets, we were able to get in at 6pm. Not knowing how many VIP tickets were for sale/sold, we wanted to show up early to get a parking spot in the parking garage located right next to the venue. We arrived around 5:40 and made our way to front entrance to wait in line. We were within the first 10 people that arrived so it clearly wasn't necessary to arrive too early. I'm not sure why they chose to do things this way, but they sent a couple people out to ID all the people waiting outside in the cold and didn't end up letting the VIPs in until around 6:10.
After we entered, we made our way down to the floor. We knew we wanted to get as many samples as we could before General Admission arrived. And boy are we glad we did. We ended up getting our last few samples around the same time that they opened the doors for everyone else.
We were so full after consuming so much beer and food in such a short amount of time. There were samples of drinks that weren't beer as well including Kinky brand bottled drinks and Not Your Father brand drinks. Food samples included pulled pork sliders, bacon donuts, bacon wrapped chorizo filled dates, bacon wrapped duck, bacon wrapped sausages with 6 sauces to choose from, bacon cheddar chips topped with nacho cheese and bacon, and bacon scones.
During VIP:
After GA started:
The main floor got full fast so we headed up to the VIP lounge where they had an unlimited BLT bar. There were 4 or 5 different kinds of bacon set out, a cheese tray, what looked like toasted slices of baguette, chopped lettuce, and chopped tomatoes.
There was also a Bloody Mary bar. Each VIP ticket holder received 2 tickets for this which could either be used to make 2 Bloody Marys or 1 double. You got the choice of regular or cucumber vodka, the choice of original, loaded, or hot & spicy Bloody Mary mix, and a large selection of “toppings” including bacon, lots of different salt options, celery, pickles, pearl onions, and so much more!
There were a couple places where they had bags/cornhole set up to play including 2 sets in the VIP lounge. Since there was nowhere to sit in the VIP lounge, we took our drinks and food and sat in the stands for a little while. Then we made our way back down to the floor to get seconds of stuff we really liked the first time around!
There was live music during the entire event. It was nothing overly entertaining, but it was great for background noise. Online, it had said there would be a bacon-eating contest, but we never did see it or hear annything about it.
At the end of the night, we got our pint glasses. They're great! And it will be an awesome reminder from the night.
Ending Thoughts: Even though they were a little pricey, we will definitely be getting the VIP tickets every time we go to this event. After having them, I can't even imagine NOT having them. We saw how busy it was and were very thankful to have had that hour with no lines.
Labels:
bacon,
beer,
Beer Festival,
festival,
Food Festival,
Travel
Home Depot Kids Workshops
I LOVE Home Depot Kids Workshops. I mean, like really love them! They occur every single month on the first Saturday of the month from 9am to noon. And there's no reason to try and get there right at 9am because they always have plenty of kits! (Or at least they do where I live.) We always have tons of fun. We always see most people put their kits together and then let their kids just go wild with the paint. And I'm so happy for them that their kids are having a great time. But my weirdo family is full of perfectionists so we usually paint the different pieces first, do a coloring page or something while they dry, and then put our kit together. But to each their own, right? I really feel like these little kits are a great teaching tool in following directions and a beginning lesson in using tools. Plus, they're a cute little project that your kid can use and be proud of. And sometimes, they make great gifts for parents and grandparents!
Here are some that we've done in the past.
And now, we're gearing up and planning the rest of our 2018 so I loved that they had a list (with pictures) out at the February workshop. You will (most likely) never see this list again! So I took a picture for you. Here's what we have to look forward to:
I highly recommend you take your kids aged 3-12 to these workshops. They'll receive safety goggles and an apron at their first workshop and after every project they complete, kids also receive a pin to put on their apron.
Here are some that we've done in the past.
And now, we're gearing up and planning the rest of our 2018 so I loved that they had a list (with pictures) out at the February workshop. You will (most likely) never see this list again! So I took a picture for you. Here's what we have to look forward to:
I highly recommend you take your kids aged 3-12 to these workshops. They'll receive safety goggles and an apron at their first workshop and after every project they complete, kids also receive a pin to put on their apron.
Sunday, February 18, 2018
Yoga with your Kids
I'm not a huge fan of working out. I just don't love it. I feel like there are so many people out there that are just obsessed with working out and I just can't seem to get into it. But that doesn't mean that I can't try to get my kid into it, right? And I'm trying to do it with him so that even though I might not like it, I'm getting a little something out of it too. And lately, we've been doing some yoga. The first introduction my son had to yoga was actually at Great Wolf Lodge when we went to the Wisconsin Dells with my sister and her family. Afterwards, they sent us home with a poster showing some yoga poses. Well, we decided to break out our poster and work on some of these poses. Now, we try to do yoga at least once a week as part of our workout. Here are just some of the poses that we do: tree, butterfly, flower, downward facing dog, and upward facing dog.
Honestly, I've seen the same poses with many different names. And we're always looking for new poses to try. Some of them are little too difficult for us, so we just modify them to the point where we can do them. We also like to do each pose for a 10-count and cycle through about 3-4 times.
Saturday, February 17, 2018
Nerf Target Game
For Christmas, my 7-year-old got a couple smaller Nerf guns. Now, we already some, but they were all bigger guns (or Chewbacca's crossbow or Captain America's shield) so we played in a different way than target practice. But since these were smaller and I was tired of getting hit with little Nerf darts, I put together this simple target game. I grabbed a couple of the cardboard tubes we had lying around from paper towel rolls and toilet paper rolls. These make great bases. The hardest part was looking for balls that were the right size and density. If they were too small, they would fall right through the tube. If they were too big, they wouldn't sit on the tube. If they were too heavy, they wouldn't fall off when they were hit with the dart. Well, I was really looking for those balls that we used to have for a ball pit when my son was like 2, but I never did find those. Instead, we used some fake snowballs I had lying around. I think I bought them at dollar tree or someplace similar over a year ago. It turns out, they were perfect! So, I found book to set our tubes on. You could easily use a table. You just need the tubes to be set on a flat surface so that they don't just fall on their own. We put up the tubes and set the snowballs on top of them. Then, we started shooting! It easy enough to set up time and time again so after the first couple of times, my son was able to play by himself and was entertained for about half an hour just shooting the targets. It's easy enough, but you can make it more challenging by backing up and shooting from further away. It's a fun little game that's easy to set up and play inside when it's too cold to go outside! (The temperature the day we played this was around -2.)
Sunday, February 11, 2018
Painted Rocks
A couple months ago, we did one of the Michael's Saturday morning kids crafts workshop. We do these from time to time when I'm looking for something to do and I remember to look up the craft ahead of time (think, busy mom that forgets a lot). The reason I always want to look ahead of time is to make sure it's something my son will actually enjoy. Our Michael's is on the opposite side of town and frankly, we just don't go over there if we don't have to. Plus, Michael's crafts aren't free. So, I saw that they were doing painted rocks and thought my son would really enjoy this! And it's SO easy to do at home. If you haven't seen these, you've been living under a rock! See what I did there...
Yeah...so...painted rocks are cool now. So we got there, walked in, they gave us our supplies (flat rocks, paintbrushes, paint, plate to put paint on, and paper towels so we didn't make a mess), and I brainstormed with my son about what we should make. That's right. We. Some parents just let their kids go at it and make whatever and that's awesome! Let your child stretch their creative wings! More power to you! But that is just not who I am. I like to make sure that he's not just making crap. He can do that at school. So we planned out what the rocks were going to look like in the end. And we talked about what he wanted to do and what he wanted me to do.
And we chose the rocks with our ideas in mind! We chose a somewhat square one for our Creeper head from Minecraft, an oval one for our owl, and then we knew we had to make a heart when we found a rock that was heart-shaped.
We did the background color for each of the rocks first. That way, when we were done, the first one was dry enough to add detail. Since our rocks were black, we had to do multiple coats for lighter colors.Make sure the paint is completely dry before adding a new layer on top to avoid your colors bleeding together.
After we finished, we let our rocks sit while we did some shopping and then came back to pick them up when they were dry. I think they turned out great and we'll definitely be making some more this summer!
Even though we had a great time painting our rocks, I am by no means endorsing Michael's Kids Club. My favorite is Home Depot's Kids Workshops, but those are only held once a month. Michael's is just a back-up if we're already planning to be out and they have something interesting on the docket. Some of their crafts are sponsored by Sprout which my kid hasn't watched in like 4 years so we're not interested at all. And while most of the crafts aren't OVERLY girly, some of them are! I mean, my son is cool with making bracelets, but he's not okay if I take him to make a fairy house. Our biggest complaint has been the people in charge of these crafts. The woman that used to be in charge of these used to complain about kids. I don't know why she felt comfortable talking about this with me, but it was really annoying and unprofessional. And the girl in charge now is just so quiet. We have to ask like 100 questions just to get the details about the craft we're making. So go into these with your eyes wide open people!
Yeah...so...painted rocks are cool now. So we got there, walked in, they gave us our supplies (flat rocks, paintbrushes, paint, plate to put paint on, and paper towels so we didn't make a mess), and I brainstormed with my son about what we should make. That's right. We. Some parents just let their kids go at it and make whatever and that's awesome! Let your child stretch their creative wings! More power to you! But that is just not who I am. I like to make sure that he's not just making crap. He can do that at school. So we planned out what the rocks were going to look like in the end. And we talked about what he wanted to do and what he wanted me to do.
And we chose the rocks with our ideas in mind! We chose a somewhat square one for our Creeper head from Minecraft, an oval one for our owl, and then we knew we had to make a heart when we found a rock that was heart-shaped.
We did the background color for each of the rocks first. That way, when we were done, the first one was dry enough to add detail. Since our rocks were black, we had to do multiple coats for lighter colors.Make sure the paint is completely dry before adding a new layer on top to avoid your colors bleeding together.
After we finished, we let our rocks sit while we did some shopping and then came back to pick them up when they were dry. I think they turned out great and we'll definitely be making some more this summer!
Even though we had a great time painting our rocks, I am by no means endorsing Michael's Kids Club. My favorite is Home Depot's Kids Workshops, but those are only held once a month. Michael's is just a back-up if we're already planning to be out and they have something interesting on the docket. Some of their crafts are sponsored by Sprout which my kid hasn't watched in like 4 years so we're not interested at all. And while most of the crafts aren't OVERLY girly, some of them are! I mean, my son is cool with making bracelets, but he's not okay if I take him to make a fairy house. Our biggest complaint has been the people in charge of these crafts. The woman that used to be in charge of these used to complain about kids. I don't know why she felt comfortable talking about this with me, but it was really annoying and unprofessional. And the girl in charge now is just so quiet. We have to ask like 100 questions just to get the details about the craft we're making. So go into these with your eyes wide open people!
Subscribe to:
Posts (Atom)