I took a couple weeks off, but now we're back at it! My summer has started off great! With lots of things going on. I don't know about you guys, but having my son at home all day, I feel like I need to plan at least 1 fun activity every day to make sure we're not just sitting around. Don't get me wrong, I have a list of things we do each day including reading for 1 hour, working out for 30 minutes, and cleaning for 30 minutes each day. As a reward for these things, I put a limit on phone use to no more than 2 hours.
Here are some of the things we do to fill our time:
1. The Library
Ours has some great public activities and even when there's nothing going on, they always have pages to color, books to read, computers to play on, toys to play with, and fun displays to check out.
2. Berry Picking
There is a fun little berry patch within half an hour of our house that we like to visit from time to time.
3. The Zoo
We have a small local zoo, but beyond that, there are 3 other zoos within an hour. Plus, 2 large named zoos within 3 hours.
4. Paint Your Own Pottery
These places are becoming more and more popular. We have a fun little place in town. We try to only visit once every couple of weeks because while fun, it can get expensive.
We also do lots of crafts and projects. My son has been getting into cooking lately, so I thought as a quick little project, I would teach him how to make homemade lemonade.
You Will Need:
1 cup of water
1 cup of sugar
Enough lemons to make 1 cup of juice (we used 5 large lemons)
7-8 more cups of water
First, combine 1 cup of water and 1 cup of sugar in a small saucepan and heat on medium until the sugar is completely dissolved (your water will appear clear again). You have now made your simple syrup. It only takes about 5 minutes. Take your pan off the heat and set it to the side to cool.
While your syrup is cooling, you can juice your lemons. If you don't have a juicer, you can squeeze the lemon while twisting a fork to get every last drop out. Make sure you strain the juice to get rid of seeds and most of the pulp.
It's time to mix together your lemon juice, simple syrup, and 7-8 cups of water. I put a rough estimate on the amount because it's all about your personal preference on taste and how strong you want your lemonade. After everything is mixed together, place it in the fridge to cool. Cold, fresh lemonade is the best. Something about making it from scratch truly makes it taste better!
If you have any other suggestions on fun, small projects I can try with my little 8yo, please, let me know in the comments below. We're always looking for new things to try out.
Showing posts with label Recipes. Show all posts
Friday, June 8, 2018
Saturday, March 17, 2018
Recipe: Biscuits and Gravy
Shoot! I got behind and wasn't able to post last weekend so I'm going to make an attempt to do double posts this weekend to make up for it! So first up is a recipe!
My husband's favorite breakfast of all time is biscuits and gravy. And not just any gravy. It has to be my homemade sausage gravy. He tried. He really did. He's ordered many biscuits and gravy from different restaurants and none compare to the deliciousness that is my recipe. And in my opinion, there is no excuse for that because this is SUPER EASY to make! So here I am, sharing my great (and incredibly simple) recipe for my awesome gravy.
Ingredients:
1 lb ground sausage (I prefer mild, but some people like spicy)
1/2 cup flour
4 cups milk
1/4 teaspoon of salt
1/4 teaspoon of pepper
8 count can of biscuits (or homemade if you're that awesome)
Steps:
1. Bake your biscuits according to the instructions on the can (or make your own).
2. Brown the sausage.
3. Mix in the flour until it's dissolved.
4. Add the milk, salt, and pepper. Bring to a boil. Stir often.
5. Keep cooking until your gravy is the consistency that you desire (5-10 minutes).
6. EAT! I cut open my biscuit and cover both halves with gravy.
My husband's favorite breakfast of all time is biscuits and gravy. And not just any gravy. It has to be my homemade sausage gravy. He tried. He really did. He's ordered many biscuits and gravy from different restaurants and none compare to the deliciousness that is my recipe. And in my opinion, there is no excuse for that because this is SUPER EASY to make! So here I am, sharing my great (and incredibly simple) recipe for my awesome gravy.
Ingredients:
1 lb ground sausage (I prefer mild, but some people like spicy)
1/2 cup flour
4 cups milk
1/4 teaspoon of salt
1/4 teaspoon of pepper
8 count can of biscuits (or homemade if you're that awesome)
Steps:
1. Bake your biscuits according to the instructions on the can (or make your own).
2. Brown the sausage.
3. Mix in the flour until it's dissolved.
4. Add the milk, salt, and pepper. Bring to a boil. Stir often.
5. Keep cooking until your gravy is the consistency that you desire (5-10 minutes).
6. EAT! I cut open my biscuit and cover both halves with gravy.
Sunday, March 4, 2018
Recipe: Chicken Tortilla Soup
Last year, my husband asked me to make chicken tortilla soup because it's one of his favorites! So I searched far and wide, started with a couple different recipes, and settled on this one after many different attempts. Now, we eat this all the time! It has become our family's go-to slow cooker soup! I absolutely love it! And so does everyone else in my house. It's pretty easy, but does take a little extra work besides throwing everything in a slow cooker and calling it a day.
Ingredients:
1 lb chicken breasts (frozen is fine)
16 oz jar salsa (we use mild)
6 c chicken broth
15.25 oz can black beans, drained and rinsed
15 oz can whole kernel corn, drained
3 T lemon juice
1 T cumin
1 t chili powder
1 t paprika
1 t salt
½ t pepper
¼ t garlic powder
¼ t cayenne pepper
Topping:
tortilla strips (you can find these near salad toppings)
Recipe:
1. Place chicken breasts on the bottom of the slow cooker.
2. Pour the rest of the ingredients on top.
3. Stir to mix all the spices.
4. Cook 6-8 hours on low (or 4 on high)
5. About 30 minutes before it's done, take the chicken out and shred it. Then, put the chicken back in, stir, and let it continue cooking for the last 30 minutes.
6. Serve with tortilla strips on top. Enjoy!
Ingredients:
1 lb chicken breasts (frozen is fine)
16 oz jar salsa (we use mild)
6 c chicken broth
15.25 oz can black beans, drained and rinsed
15 oz can whole kernel corn, drained
3 T lemon juice
1 T cumin
1 t chili powder
1 t paprika
1 t salt
½ t pepper
¼ t garlic powder
¼ t cayenne pepper
Topping:
tortilla strips (you can find these near salad toppings)
Recipe:
1. Place chicken breasts on the bottom of the slow cooker.
2. Pour the rest of the ingredients on top.
3. Stir to mix all the spices.
4. Cook 6-8 hours on low (or 4 on high)
5. About 30 minutes before it's done, take the chicken out and shred it. Then, put the chicken back in, stir, and let it continue cooking for the last 30 minutes.
6. Serve with tortilla strips on top. Enjoy!
Saturday, January 27, 2018
Winter Cupcakes
A couple weeks ago, I was in charge of making cupcakes for our monthly choir treats night. The person I was paired up with wanted to do a winter wonderland theme so I was off on a mission to make my cupcakes look like they were ready for a winter wonderland. For the base, I made 2 batches: a simple chocolate cupcake and a simple vanilla cupcake. I was kind of in a hurry so I didn't have time to get crazy with my flavors. Besides, this post is about the decoration, not the recipe.
Since I was making 2 batches (about 44 cupcakes), I started with 32 oz of white frosting. Then, I added just a few (about 6) drops of blue food coloring. I didn't want it to be too blue, just more of like a subtle ice blue. I piped the frosting on top of the cupcakes (make sure they're completely cool first) and let them dry. I sprinkled a couple of them with glitter sprinkles to make it look like snow.
Then, I made the white chocolate snowflakes. I traced some snowflake designs on a piece of wax paper. Flip the wax paper over. Melt some almond bark. Put the melted almond bark in a squeeze bottle. Pipe/Trace the snowflakes. If it's too hot, wrap the bottle in a towel. Let the snowflakes dry completely before trying to take them off the wax paper and placing them on the cupcakes. I even added some blue sugar sprinkles to some of them.
After my choir practice, I put together my cupcake tower and placed them all on there. Everyone kept complimenting me so I think they turned out perfectly for what I needed them for. The tracing technique for almond bark is such a simple thing that it makes it useful for any occasion.
Since I was making 2 batches (about 44 cupcakes), I started with 32 oz of white frosting. Then, I added just a few (about 6) drops of blue food coloring. I didn't want it to be too blue, just more of like a subtle ice blue. I piped the frosting on top of the cupcakes (make sure they're completely cool first) and let them dry. I sprinkled a couple of them with glitter sprinkles to make it look like snow.
Then, I made the white chocolate snowflakes. I traced some snowflake designs on a piece of wax paper. Flip the wax paper over. Melt some almond bark. Put the melted almond bark in a squeeze bottle. Pipe/Trace the snowflakes. If it's too hot, wrap the bottle in a towel. Let the snowflakes dry completely before trying to take them off the wax paper and placing them on the cupcakes. I even added some blue sugar sprinkles to some of them.
After my choir practice, I put together my cupcake tower and placed them all on there. Everyone kept complimenting me so I think they turned out perfectly for what I needed them for. The tracing technique for almond bark is such a simple thing that it makes it useful for any occasion.
Saturday, January 20, 2018
Recipe: Caramel Apple Moscow Mule
Sometimes, my family needs to schedule our Christmas celebration on a day other than Christmas in order for everyone to be able to see all of their families (think in-laws). This year, we had our get-together the Saturday after Christmas. And since we had all eaten such big, traditional meals on Christmas, we decided to do a bunch of appetizers. I brought a maple pecan dessert dip with nilla wafers and teddy grahams, eggnog, and ham and cheese croissants. There was more than enough food. But you know what really sticks out in my mind? It was the caramel apple moscow mules that my sister made! They were delicious! Here's how she made them:
3 parts apple cider
2 parts ginger beer
1 part caramel vodka
splash of caramel syrup
stir with a cinnamon stick
garnish with an apple slice
I'm not a huge drinker, but I had about 3 of these! They were so good! If you think it's a little sweet, you can leave out the caramel syrup. There were a couple people who left out the cinnamon stick (but I think it helps to cover the ginger beer taste – which I'm not a fan of). I hope you'll make this drink at your next get-together. It was definitely a hit with our family!
3 parts apple cider
2 parts ginger beer
1 part caramel vodka
splash of caramel syrup
stir with a cinnamon stick
garnish with an apple slice
I'm not a huge drinker, but I had about 3 of these! They were so good! If you think it's a little sweet, you can leave out the caramel syrup. There were a couple people who left out the cinnamon stick (but I think it helps to cover the ginger beer taste – which I'm not a fan of). I hope you'll make this drink at your next get-together. It was definitely a hit with our family!
Labels:
alcohol,
apple,
caramel apple,
drink,
moscow mule,
Recipes
Saturday, September 9, 2017
Snack Necklaces
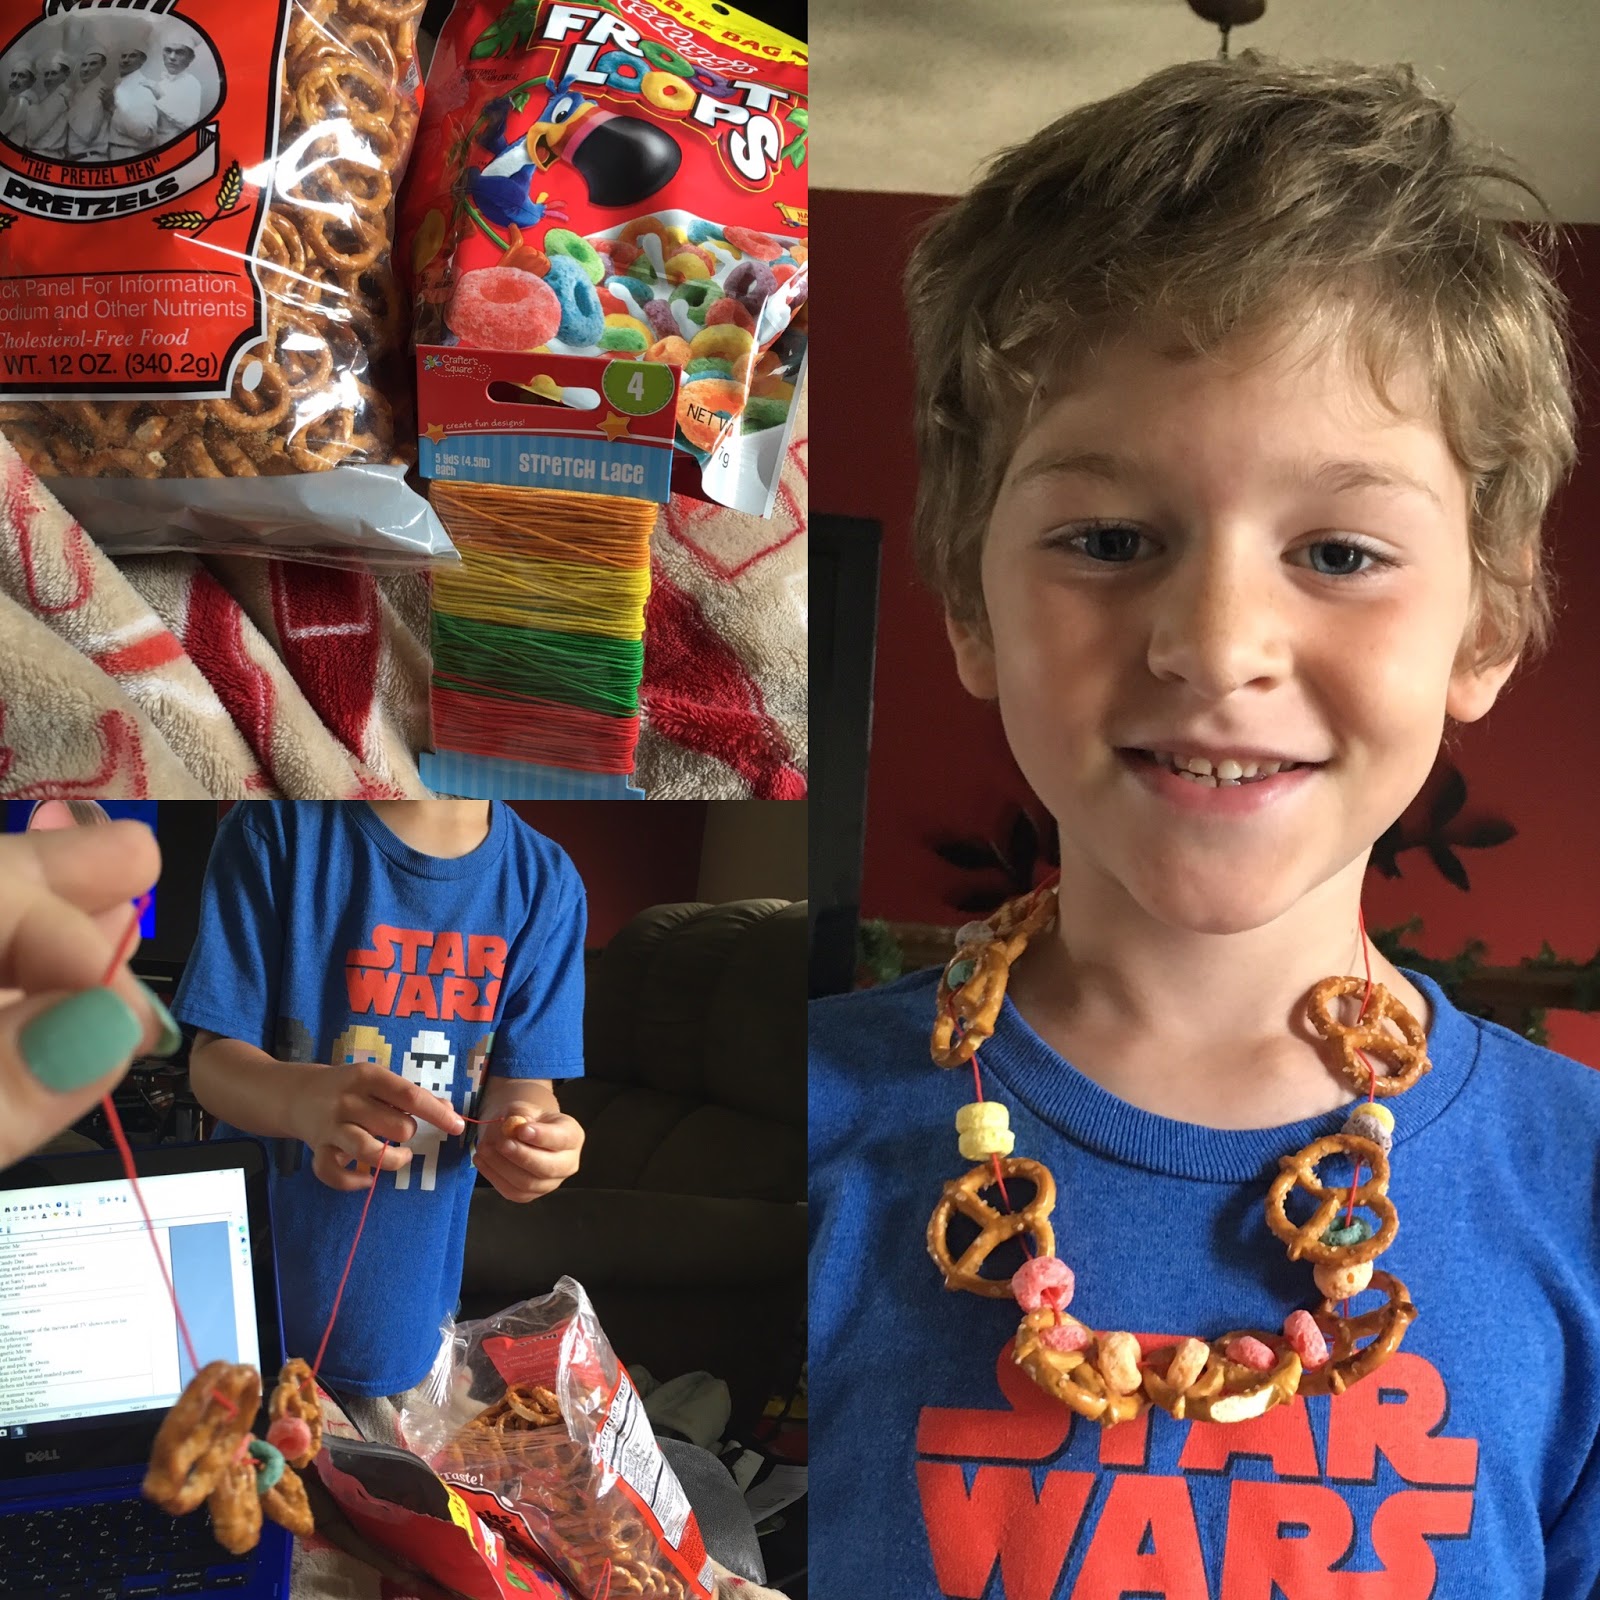
This is a fun little craft to do with your kids before a vacation (or anytime, really). We made 8 of them before we went on our huge long road trip. They turned out great! I wanted to make these as cheap as possible so we went to Dollar Tree where we found some stretchy string, a bag of fruit loops, and some pretzels! You could easily use any other snack item that has a hole in it like cheerios, gummy lifesavers, chocolate covered pretzels, mini cookies, chocolate cheerios, etc. or you could use a needle and thread and go through squishy foods like grapes, blueberries, dried pineapple, gummy bears, popcorn, etc. as well as your holed snacks. Any combination of these things would be delicious. Part of the reason I chose what I did was because I could find them at Dollar Tree, which is cheap, yes, but also because I didn't want to worry about melting chocolate or candy. Plus, we were using string and not a needle and thread. So anyway, here's how we did it:
First, gather all of your ingredients.
Then, cut a length of string that at minimum fits around your head.
Slide your snacks on the string.
And tie the ends together.
See? Easy! And fun for kids to make and then later, eat!
First, gather all of your ingredients.
Then, cut a length of string that at minimum fits around your head.
Slide your snacks on the string.
And tie the ends together.
See? Easy! And fun for kids to make and then later, eat!
Saturday, August 12, 2017
Dehydrated Strawberries
I got my husband a food dehydrator for our anniversary last year. He didn't really touch it for a couple months because we were SUPER busy. But once he finally broke it open and started playing with it, he really got into it and started dehydrating everything! My favorite thing he dehydrates are definitely the fruits! Specifically, strawberries! Here's how we did it:
First, I cut the strawberries into thin slices.
Then, we put them on the trays of our dehydrator and turned it on! It's that simple!! Amazing, right? We left the strawberries in there for about 12-14 hours. They turned out great!
First, I cut the strawberries into thin slices.
Then, we put them on the trays of our dehydrator and turned it on! It's that simple!! Amazing, right? We left the strawberries in there for about 12-14 hours. They turned out great!
Sunday, June 18, 2017
Kids Recipe: Fudge Pops
I have such a fun, easy, and delicious recipe for you today! Your kids can do this one all by themselves!
Ingredients:
chocolate pudding mix
milk
mini chocolate chips
popsicle molds
Mix everything together and pour it in in those popsicle molds.
Freeze for a couple hours. And enjoy! If you have any trouble getting them out of the mold, run the mold under some warm water.
Ingredients:
chocolate pudding mix
milk
mini chocolate chips
popsicle molds
Mix everything together and pour it in in those popsicle molds.
Freeze for a couple hours. And enjoy! If you have any trouble getting them out of the mold, run the mold under some warm water.
Saturday, June 3, 2017
Kids Recipe: Worm Popsicles
I have a super easy popsicle recipe for you that you can totally change up and make your own! Plus, kids can make it all by themselves!
This popsicle only needs 2 things. Some kind of juice and candy. That's it!
We chose to use orange soda and gummy worms. So, here it is: We poured the orange soda into the popsicle molds, added one gummy worm to each one, and then stuck the stick into it! That's it! So easy! Freeze and serve! Since we used soda, they did expand a little, but not enough to really matter.
They were delicious and so much fun!
This popsicle only needs 2 things. Some kind of juice and candy. That's it!
We chose to use orange soda and gummy worms. So, here it is: We poured the orange soda into the popsicle molds, added one gummy worm to each one, and then stuck the stick into it! That's it! So easy! Freeze and serve! Since we used soda, they did expand a little, but not enough to really matter.
They were delicious and so much fun!
Sunday, May 21, 2017
Recipe: Seasoned Crackers
My grandma used to make these all the time and I absolutely love the taste. Now that she has passed, it is up to me to keep up the tradition. We make seasoned crackers for holidays and vacations. I'm not sure why those are the big cracker times for us, but it's tradition!
Ingredients:
2 bags of oyster crackers
1 cup oil (I use vegetable)
1 teaspoon dill weed
1/2 teaspoon pepper
1/2 teaspoon garlic powder
1 ranch packet
Step 1: Preheat oven to 300 degrees. Put foil over 2 baking sheets.
Step 2: Mix all ingredients except crackers together in a small bowl. Put crackers in a paper bag and pour oil mixture over top. Shake until crackers are coated with mixture.
Step 3: Pour crackers onto baking sheets. Bake for 15-20 minutes. Keep a good eye on them though. In my oven, this is an accurate time, but I noticed when baking them in my MIL's oven that they browned very fast. You don't want the crackers to brown very much. Baking them is more just to dry out the oil.
Let cool. Serve! They're delicious...and very addicting.
Ingredients:
2 bags of oyster crackers
1 cup oil (I use vegetable)
1 teaspoon dill weed
1/2 teaspoon pepper
1/2 teaspoon garlic powder
1 ranch packet
Step 1: Preheat oven to 300 degrees. Put foil over 2 baking sheets.
Step 2: Mix all ingredients except crackers together in a small bowl. Put crackers in a paper bag and pour oil mixture over top. Shake until crackers are coated with mixture.
Step 3: Pour crackers onto baking sheets. Bake for 15-20 minutes. Keep a good eye on them though. In my oven, this is an accurate time, but I noticed when baking them in my MIL's oven that they browned very fast. You don't want the crackers to brown very much. Baking them is more just to dry out the oil.
Let cool. Serve! They're delicious...and very addicting.
Tuesday, April 25, 2017
First, let me introduce myself...
Hi! So I've tried this whole blogging thing before, but it just felt like so much pressure. This time around, I'm going to make it simple and fun! Who's ready?
My plan is to have posts about everything I do as a mom...and some extras.
Like all the fun crafts we do.
And all the fun places we visit.
And all the super fun things we have planned for this summer!
So if you're ready. Let's get started!
But first, here's a picture of my sweet family and a little background on me.
I am a mom of a wonderful 7-year-old boy. I've been married for 5 1/2 years. I used to work as a preschool teacher. But then I discovered that I really enjoyed being a stay-at-home mom more than anything else so I chose to quit my job and devote all of my time to my family. And here we are. I love photography, crochet, pottery, singing, crafting, swimming, and just hanging out with my family.
Now that you know a little about me, let's kick this party off with a bang! Check out my next blog post for an awesome recap on a trip my family took last month!
My plan is to have posts about everything I do as a mom...and some extras.
Like all the fun crafts we do.
And all the fun places we visit.
And all the super fun things we have planned for this summer!
So if you're ready. Let's get started!
But first, here's a picture of my sweet family and a little background on me.
I am a mom of a wonderful 7-year-old boy. I've been married for 5 1/2 years. I used to work as a preschool teacher. But then I discovered that I really enjoyed being a stay-at-home mom more than anything else so I chose to quit my job and devote all of my time to my family. And here we are. I love photography, crochet, pottery, singing, crafting, swimming, and just hanging out with my family.
Now that you know a little about me, let's kick this party off with a bang! Check out my next blog post for an awesome recap on a trip my family took last month!
Subscribe to:
Posts (Atom)