I took a couple weeks off, but now we're back at it! My summer has started off great! With lots of things going on. I don't know about you guys, but having my son at home all day, I feel like I need to plan at least 1 fun activity every day to make sure we're not just sitting around. Don't get me wrong, I have a list of things we do each day including reading for 1 hour, working out for 30 minutes, and cleaning for 30 minutes each day. As a reward for these things, I put a limit on phone use to no more than 2 hours.
Here are some of the things we do to fill our time:
1. The Library
Ours has some great public activities and even when there's nothing going on, they always have pages to color, books to read, computers to play on, toys to play with, and fun displays to check out.
2. Berry Picking
There is a fun little berry patch within half an hour of our house that we like to visit from time to time.
3. The Zoo
We have a small local zoo, but beyond that, there are 3 other zoos within an hour. Plus, 2 large named zoos within 3 hours.
4. Paint Your Own Pottery
These places are becoming more and more popular. We have a fun little place in town. We try to only visit once every couple of weeks because while fun, it can get expensive.
We also do lots of crafts and projects. My son has been getting into cooking lately, so I thought as a quick little project, I would teach him how to make homemade lemonade.
You Will Need:
1 cup of water
1 cup of sugar
Enough lemons to make 1 cup of juice (we used 5 large lemons)
7-8 more cups of water
First, combine 1 cup of water and 1 cup of sugar in a small saucepan and heat on medium until the sugar is completely dissolved (your water will appear clear again). You have now made your simple syrup. It only takes about 5 minutes. Take your pan off the heat and set it to the side to cool.
While your syrup is cooling, you can juice your lemons. If you don't have a juicer, you can squeeze the lemon while twisting a fork to get every last drop out. Make sure you strain the juice to get rid of seeds and most of the pulp.
It's time to mix together your lemon juice, simple syrup, and 7-8 cups of water. I put a rough estimate on the amount because it's all about your personal preference on taste and how strong you want your lemonade. After everything is mixed together, place it in the fridge to cool. Cold, fresh lemonade is the best. Something about making it from scratch truly makes it taste better!
If you have any other suggestions on fun, small projects I can try with my little 8yo, please, let me know in the comments below. We're always looking for new things to try out.
Showing posts with label kids activity. Show all posts
Friday, June 8, 2018
Sunday, May 20, 2018
Summer Bucket List
Every summer, my son and I like to make a list of things that we want to do before school starts back up. We got together and pooled all of our ideas and came up with this list of 50 things we want to do this summer. Here is our summer bucket list for 2018!
Click here to view a PDF and download.
Saturday, February 24, 2018
Home Depot Kids Workshops
I LOVE Home Depot Kids Workshops. I mean, like really love them! They occur every single month on the first Saturday of the month from 9am to noon. And there's no reason to try and get there right at 9am because they always have plenty of kits! (Or at least they do where I live.) We always have tons of fun. We always see most people put their kits together and then let their kids just go wild with the paint. And I'm so happy for them that their kids are having a great time. But my weirdo family is full of perfectionists so we usually paint the different pieces first, do a coloring page or something while they dry, and then put our kit together. But to each their own, right? I really feel like these little kits are a great teaching tool in following directions and a beginning lesson in using tools. Plus, they're a cute little project that your kid can use and be proud of. And sometimes, they make great gifts for parents and grandparents!
Here are some that we've done in the past.
And now, we're gearing up and planning the rest of our 2018 so I loved that they had a list (with pictures) out at the February workshop. You will (most likely) never see this list again! So I took a picture for you. Here's what we have to look forward to:
I highly recommend you take your kids aged 3-12 to these workshops. They'll receive safety goggles and an apron at their first workshop and after every project they complete, kids also receive a pin to put on their apron.
Here are some that we've done in the past.
And now, we're gearing up and planning the rest of our 2018 so I loved that they had a list (with pictures) out at the February workshop. You will (most likely) never see this list again! So I took a picture for you. Here's what we have to look forward to:
I highly recommend you take your kids aged 3-12 to these workshops. They'll receive safety goggles and an apron at their first workshop and after every project they complete, kids also receive a pin to put on their apron.
Sunday, February 18, 2018
Yoga with your Kids
I'm not a huge fan of working out. I just don't love it. I feel like there are so many people out there that are just obsessed with working out and I just can't seem to get into it. But that doesn't mean that I can't try to get my kid into it, right? And I'm trying to do it with him so that even though I might not like it, I'm getting a little something out of it too. And lately, we've been doing some yoga. The first introduction my son had to yoga was actually at Great Wolf Lodge when we went to the Wisconsin Dells with my sister and her family. Afterwards, they sent us home with a poster showing some yoga poses. Well, we decided to break out our poster and work on some of these poses. Now, we try to do yoga at least once a week as part of our workout. Here are just some of the poses that we do: tree, butterfly, flower, downward facing dog, and upward facing dog.
Honestly, I've seen the same poses with many different names. And we're always looking for new poses to try. Some of them are little too difficult for us, so we just modify them to the point where we can do them. We also like to do each pose for a 10-count and cycle through about 3-4 times.
Saturday, February 17, 2018
Nerf Target Game
For Christmas, my 7-year-old got a couple smaller Nerf guns. Now, we already some, but they were all bigger guns (or Chewbacca's crossbow or Captain America's shield) so we played in a different way than target practice. But since these were smaller and I was tired of getting hit with little Nerf darts, I put together this simple target game. I grabbed a couple of the cardboard tubes we had lying around from paper towel rolls and toilet paper rolls. These make great bases. The hardest part was looking for balls that were the right size and density. If they were too small, they would fall right through the tube. If they were too big, they wouldn't sit on the tube. If they were too heavy, they wouldn't fall off when they were hit with the dart. Well, I was really looking for those balls that we used to have for a ball pit when my son was like 2, but I never did find those. Instead, we used some fake snowballs I had lying around. I think I bought them at dollar tree or someplace similar over a year ago. It turns out, they were perfect! So, I found book to set our tubes on. You could easily use a table. You just need the tubes to be set on a flat surface so that they don't just fall on their own. We put up the tubes and set the snowballs on top of them. Then, we started shooting! It easy enough to set up time and time again so after the first couple of times, my son was able to play by himself and was entertained for about half an hour just shooting the targets. It's easy enough, but you can make it more challenging by backing up and shooting from further away. It's a fun little game that's easy to set up and play inside when it's too cold to go outside! (The temperature the day we played this was around -2.)
Sunday, February 11, 2018
Painted Rocks
A couple months ago, we did one of the Michael's Saturday morning kids crafts workshop. We do these from time to time when I'm looking for something to do and I remember to look up the craft ahead of time (think, busy mom that forgets a lot). The reason I always want to look ahead of time is to make sure it's something my son will actually enjoy. Our Michael's is on the opposite side of town and frankly, we just don't go over there if we don't have to. Plus, Michael's crafts aren't free. So, I saw that they were doing painted rocks and thought my son would really enjoy this! And it's SO easy to do at home. If you haven't seen these, you've been living under a rock! See what I did there...
Yeah...so...painted rocks are cool now. So we got there, walked in, they gave us our supplies (flat rocks, paintbrushes, paint, plate to put paint on, and paper towels so we didn't make a mess), and I brainstormed with my son about what we should make. That's right. We. Some parents just let their kids go at it and make whatever and that's awesome! Let your child stretch their creative wings! More power to you! But that is just not who I am. I like to make sure that he's not just making crap. He can do that at school. So we planned out what the rocks were going to look like in the end. And we talked about what he wanted to do and what he wanted me to do.
And we chose the rocks with our ideas in mind! We chose a somewhat square one for our Creeper head from Minecraft, an oval one for our owl, and then we knew we had to make a heart when we found a rock that was heart-shaped.
We did the background color for each of the rocks first. That way, when we were done, the first one was dry enough to add detail. Since our rocks were black, we had to do multiple coats for lighter colors.Make sure the paint is completely dry before adding a new layer on top to avoid your colors bleeding together.
After we finished, we let our rocks sit while we did some shopping and then came back to pick them up when they were dry. I think they turned out great and we'll definitely be making some more this summer!
Even though we had a great time painting our rocks, I am by no means endorsing Michael's Kids Club. My favorite is Home Depot's Kids Workshops, but those are only held once a month. Michael's is just a back-up if we're already planning to be out and they have something interesting on the docket. Some of their crafts are sponsored by Sprout which my kid hasn't watched in like 4 years so we're not interested at all. And while most of the crafts aren't OVERLY girly, some of them are! I mean, my son is cool with making bracelets, but he's not okay if I take him to make a fairy house. Our biggest complaint has been the people in charge of these crafts. The woman that used to be in charge of these used to complain about kids. I don't know why she felt comfortable talking about this with me, but it was really annoying and unprofessional. And the girl in charge now is just so quiet. We have to ask like 100 questions just to get the details about the craft we're making. So go into these with your eyes wide open people!
Yeah...so...painted rocks are cool now. So we got there, walked in, they gave us our supplies (flat rocks, paintbrushes, paint, plate to put paint on, and paper towels so we didn't make a mess), and I brainstormed with my son about what we should make. That's right. We. Some parents just let their kids go at it and make whatever and that's awesome! Let your child stretch their creative wings! More power to you! But that is just not who I am. I like to make sure that he's not just making crap. He can do that at school. So we planned out what the rocks were going to look like in the end. And we talked about what he wanted to do and what he wanted me to do.
And we chose the rocks with our ideas in mind! We chose a somewhat square one for our Creeper head from Minecraft, an oval one for our owl, and then we knew we had to make a heart when we found a rock that was heart-shaped.
We did the background color for each of the rocks first. That way, when we were done, the first one was dry enough to add detail. Since our rocks were black, we had to do multiple coats for lighter colors.Make sure the paint is completely dry before adding a new layer on top to avoid your colors bleeding together.
After we finished, we let our rocks sit while we did some shopping and then came back to pick them up when they were dry. I think they turned out great and we'll definitely be making some more this summer!
Even though we had a great time painting our rocks, I am by no means endorsing Michael's Kids Club. My favorite is Home Depot's Kids Workshops, but those are only held once a month. Michael's is just a back-up if we're already planning to be out and they have something interesting on the docket. Some of their crafts are sponsored by Sprout which my kid hasn't watched in like 4 years so we're not interested at all. And while most of the crafts aren't OVERLY girly, some of them are! I mean, my son is cool with making bracelets, but he's not okay if I take him to make a fairy house. Our biggest complaint has been the people in charge of these crafts. The woman that used to be in charge of these used to complain about kids. I don't know why she felt comfortable talking about this with me, but it was really annoying and unprofessional. And the girl in charge now is just so quiet. We have to ask like 100 questions just to get the details about the craft we're making. So go into these with your eyes wide open people!
Saturday, February 10, 2018
Science: Float or Sink
I decided to do a fun little science experiment with my 7-year-old son a couple weeks ago. This takes hardly any time to set up and you have all of your supplies lying around your house. How great is that? I love an easy project that doesn't cost anything that my son finds fun! Plus, he's learning something along the way.
First, I had Owen walk around the house and find 15 things that wouldn't be ruined by water. I told him we were going to see if which ones sink and which ones float so make sure you pick out a variety of things so that not all of them sink or that not all of them float.
Then, we found a large bowl or small bucket (just make sure all the things you picked out with fit). We filled our bowl half full with water. We folded a towel in half to put next to our bowl so that we would have someplace to put our items after we took them out of the water.
I then prepped a piece of paper to fill out so that we could record our results that included 3 columns for items, prediction, and result. I wrote in each item and then we made our predictions.
Then it was finally time to put everything together and see which ones sink and which ones float. We did one item at a time. Owen ended up guessing 14 out of our 15 items correctly! I think that's pretty good. Then, we talked about why each individual item floated or sank. 7-year-olds now-a-days are pretty smart!
One of the great things about this little experiment is that you could adapt it to any age group. I easily could have done this with my 3-year-old preschool class when I was teaching. But you could even do it with 5th graders! I think the biggest difference is deciding how much freedom the kids have in picking out items and then the conversation afterwards about why each item floats or sinks and how in-depth you get with it. Either way, it's a fun little experiment to do with kids!
First, I had Owen walk around the house and find 15 things that wouldn't be ruined by water. I told him we were going to see if which ones sink and which ones float so make sure you pick out a variety of things so that not all of them sink or that not all of them float.
Then, we found a large bowl or small bucket (just make sure all the things you picked out with fit). We filled our bowl half full with water. We folded a towel in half to put next to our bowl so that we would have someplace to put our items after we took them out of the water.
I then prepped a piece of paper to fill out so that we could record our results that included 3 columns for items, prediction, and result. I wrote in each item and then we made our predictions.
Then it was finally time to put everything together and see which ones sink and which ones float. We did one item at a time. Owen ended up guessing 14 out of our 15 items correctly! I think that's pretty good. Then, we talked about why each individual item floated or sank. 7-year-olds now-a-days are pretty smart!
One of the great things about this little experiment is that you could adapt it to any age group. I easily could have done this with my 3-year-old preschool class when I was teaching. But you could even do it with 5th graders! I think the biggest difference is deciding how much freedom the kids have in picking out items and then the conversation afterwards about why each item floats or sinks and how in-depth you get with it. Either way, it's a fun little experiment to do with kids!
Saturday, September 16, 2017
"What Am I?" Guessing Game
If you've read any of my recent posts, you'll know that we recently took a very long road trip. And in an effort to save some money, I made a bunch of things to keep my 7yo son entertained while we spent so many hours in the car. One of those things is a little game that I made called "What Am I?" I took some photos of things VERY close up. Some of these things are easy to tell what they are while others are much more difficult! Some of them he had a real tough time figuring out what it was so I gave him some hints. If you want to download the PDF, there is a link at the bottom. And no worries, I included an Answer Key!
Click here for a downloadable PDF of "What Am I?"
Saturday, September 9, 2017
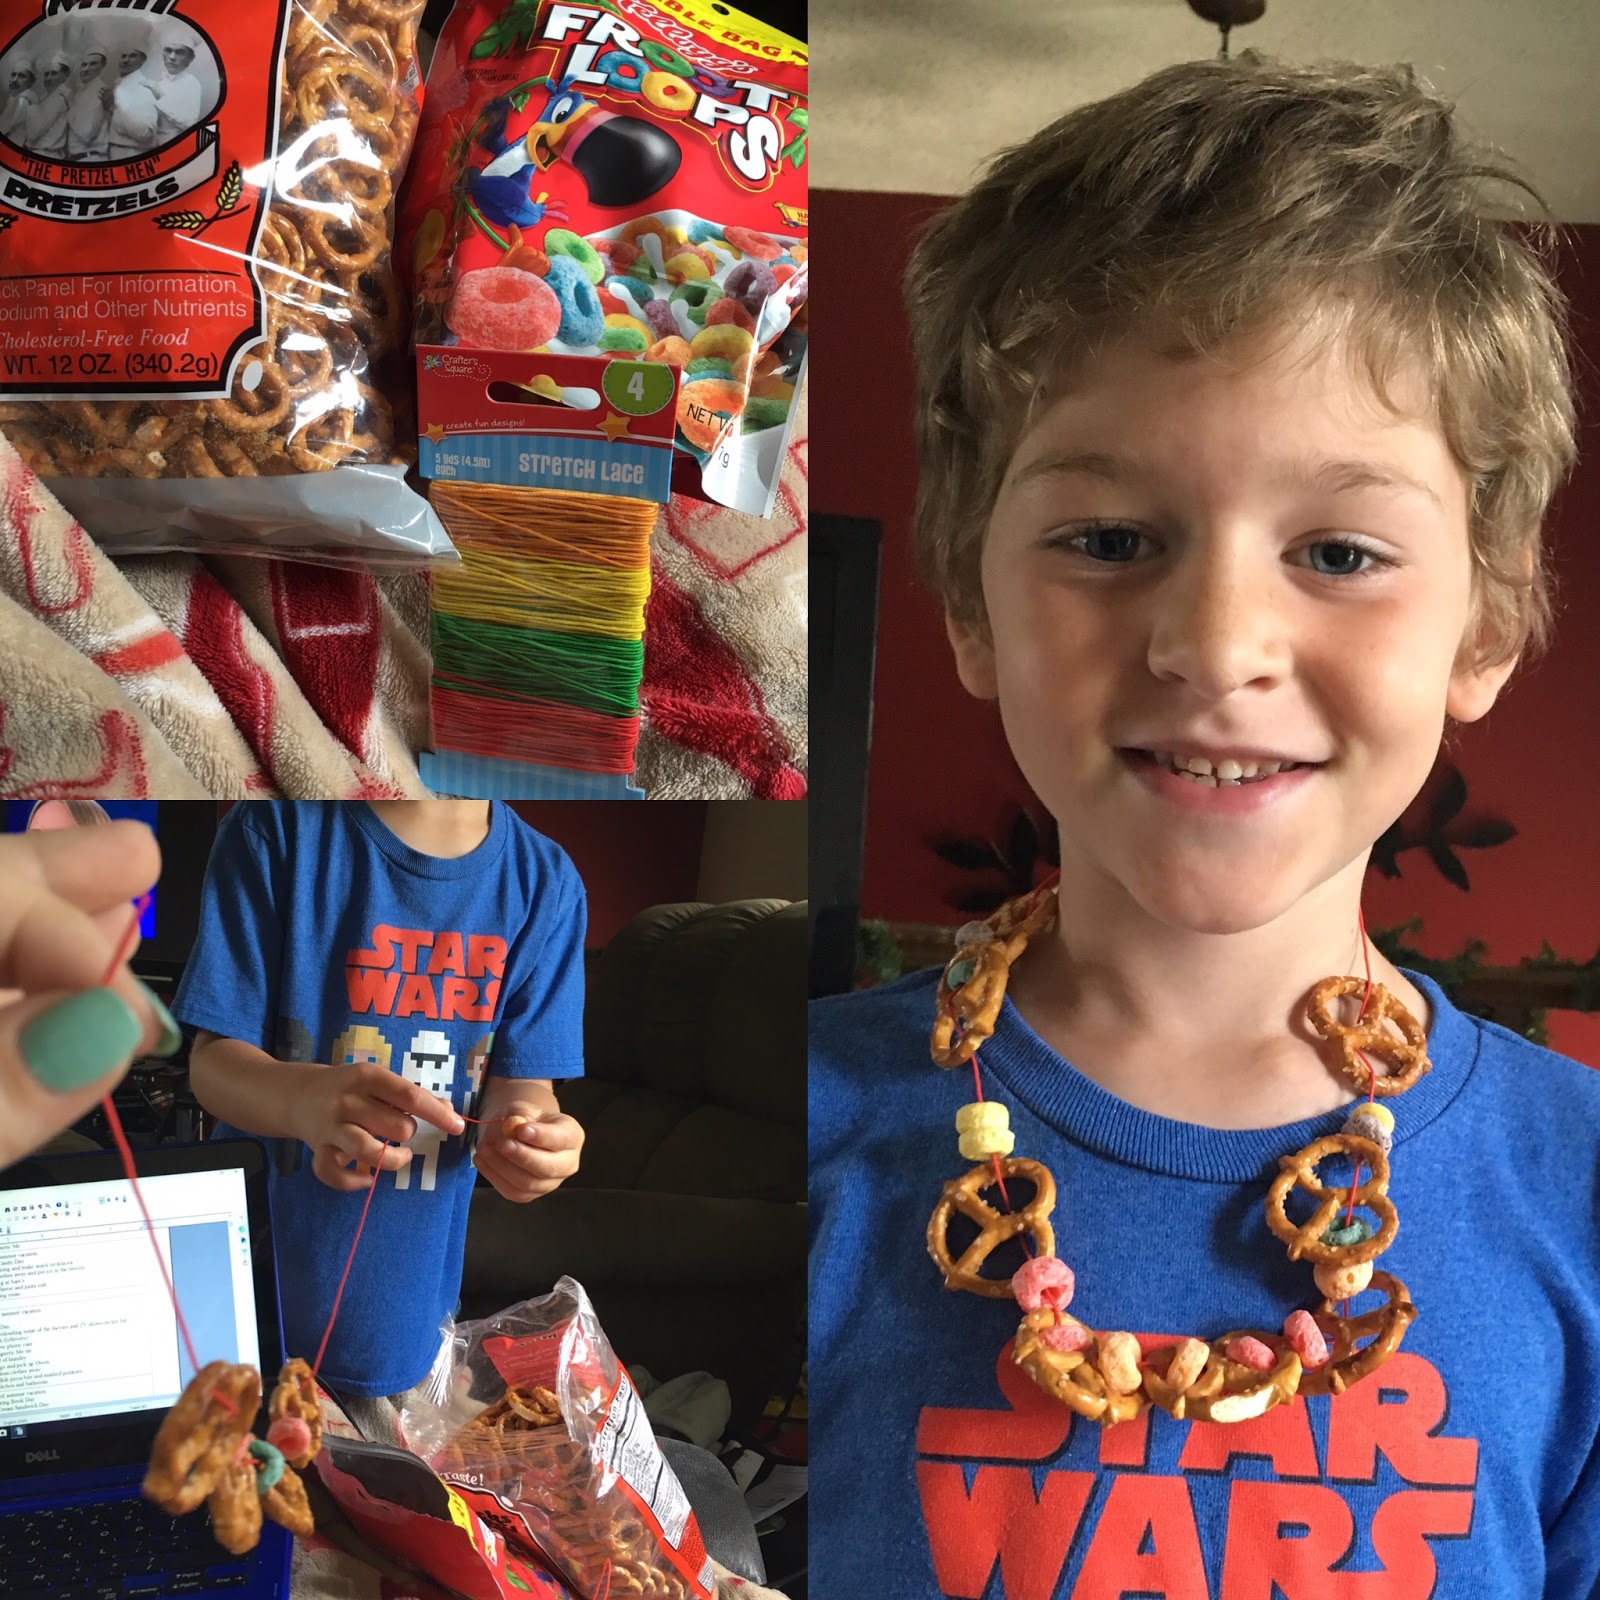
Snack Necklaces
This is a fun little craft to do with your kids before a vacation (or anytime, really). We made 8 of them before we went on our huge long road trip. They turned out great! I wanted to make these as cheap as possible so we went to Dollar Tree where we found some stretchy string, a bag of fruit loops, and some pretzels! You could easily use any other snack item that has a hole in it like cheerios, gummy lifesavers, chocolate covered pretzels, mini cookies, chocolate cheerios, etc. or you could use a needle and thread and go through squishy foods like grapes, blueberries, dried pineapple, gummy bears, popcorn, etc. as well as your holed snacks. Any combination of these things would be delicious. Part of the reason I chose what I did was because I could find them at Dollar Tree, which is cheap, yes, but also because I didn't want to worry about melting chocolate or candy. Plus, we were using string and not a needle and thread. So anyway, here's how we did it:
First, gather all of your ingredients.
Then, cut a length of string that at minimum fits around your head.
Slide your snacks on the string.
And tie the ends together.
See? Easy! And fun for kids to make and then later, eat!
First, gather all of your ingredients.
Then, cut a length of string that at minimum fits around your head.
Slide your snacks on the string.
And tie the ends together.
See? Easy! And fun for kids to make and then later, eat!
Saturday, September 2, 2017
Bubble Painting
A couple months ago, I had tried the bubble painting technique on a piece of pottery I was working on. I thought it had turned out pretty good. Then, I thought, "I bet my son would enjoy doing this!" After all, what kid doesn't like to blow bubbles in their drink. And this time, you don't even have to tell them to stop!
This is very easy. It doesn't take a lot of prep work and kids have so much fun. So first, you need to put something under your work so that you don't make a huge mess. I used a box. Then, mix together some dish soap, paint, and water. I didn't meausure anything. You need water to thin out your mixture, but you don't want too much or the bubbles won't have enough color. I mixed it all together with a straw and then let my little guy start blowing into the cup. The bubbles started flowing out after a while and made a beautiful little mess onto our paper. We quickly cleaned everything out and then tried again with a different color. And that's how we made our bubble art! Amazing!
Sunday, August 20, 2017
Magnetic Me
We just went on a super fun road trip! We were on the road for over 40 hours total. That's a lot of down time to be doing lots of random things to keep busy and not be bored. Plus, we had a 7-year-old with us! Lots of time in a car can make for a very cranky child. So I set out to make some homemade travel gifts to save some money. Now, if you have to buy everything for this, it won't really save you much money, but it will still be a fun toy for your kids. And since it's magnetic, the pieces won't fall and get lost in the car! Yay. Win-Win.
So what we're making today is a tin box with a picture of your child in it and fun magnetic disguises. We had bought our magnetic disguises from Amazon about 2 years ago. They are so much fun on the fridge (especially when our elf comes at Christmas). I figured, we could always put them back on the fridge after our vacation, but keep the tin to put them in anytime we want to take them with us. Easy, right?
Honestly, the hardest part was finding the tin! I had thought about using an altoid tin, but I just don't like altoids so I didn't want to buy something I wouldn't use. Then, I thought about those tins of puzzles you can get from Dollar Tree. That sounded like the best option so I went to look for them. Ours was sold out! Bummer. I went to check at another Dollar Tree and they were also sold out! I thought all hope was lost when I came across this Emergency Fashion Kit at Dollar Tree. It was perfect! I didn't really care what the outside looked like (but it was a plus that it was cute).
Anyway, I printed a cute picture of my son and cut it down to fit the tin. Then, I used some hot glue to keep the picture in place. Then, I filled the tin with the disguises. And Done! So much fun!
So what we're making today is a tin box with a picture of your child in it and fun magnetic disguises. We had bought our magnetic disguises from Amazon about 2 years ago. They are so much fun on the fridge (especially when our elf comes at Christmas). I figured, we could always put them back on the fridge after our vacation, but keep the tin to put them in anytime we want to take them with us. Easy, right?
Honestly, the hardest part was finding the tin! I had thought about using an altoid tin, but I just don't like altoids so I didn't want to buy something I wouldn't use. Then, I thought about those tins of puzzles you can get from Dollar Tree. That sounded like the best option so I went to look for them. Ours was sold out! Bummer. I went to check at another Dollar Tree and they were also sold out! I thought all hope was lost when I came across this Emergency Fashion Kit at Dollar Tree. It was perfect! I didn't really care what the outside looked like (but it was a plus that it was cute).
Anyway, I printed a cute picture of my son and cut it down to fit the tin. Then, I used some hot glue to keep the picture in place. Then, I filled the tin with the disguises. And Done! So much fun!
Saturday, August 19, 2017
Chalk Game: Target Practice
We got home from doing some errands one day and my son asks me, "Can we do something outside today?" Well, how do you say no to that? So, I came up with a couple fun things we could do while we were outside and one of them is a very simple, easy to play game.
Step 1: Use chalk to make yourself a target.
Step 2: Assign points to each circle to keep score.
Step 3: Throw bean bags at the target, trying to hit the center from a predetermined distance.
Step 4: The first person to get to a predetermined score wins! (We chose 30)
That's it. Have fun!
Step 1: Use chalk to make yourself a target.
Step 2: Assign points to each circle to keep score.
Step 3: Throw bean bags at the target, trying to hit the center from a predetermined distance.
Step 4: The first person to get to a predetermined score wins! (We chose 30)
That's it. Have fun!
Saturday, August 5, 2017
Stress Ball
I made the cutest, easiest, little stress ball for my son to play with on our huge long road trip we're taking this month. Are you ready? Okay, here it is. I took a balloon and stuffed it with playdough. That's it! I tied off the end and that was it. Okay, okay, you caught me. It was a little more difficult than that. But not much more! I promise! First of all, I found the cutest balloon that was shaped like a heart in a random bag that I had bought from the Dollar Store. Then, I used one of the little .3 oz packages of playdough that we had sitting around the house because my son doesn't really play with it too much even though people still buy it for us for some reason.
Now, to get the playdough into the balloon, I used small portions at a time that I rolled into worm shapes and then shoved into the balloon opening. This would have been so much easier had I had someone to hold open the balloon for me. Instead, I had to try and finagle my fingers around and shove it in there quickly. Anyway, I eventually got it all in the balloon and then tied off the end. The end was a little long so I just cut the excess off.
I had so much fun squishing and playing with it after I was done that I know my son will just love it! See, that was pretty easy, huh?
Now, to get the playdough into the balloon, I used small portions at a time that I rolled into worm shapes and then shoved into the balloon opening. This would have been so much easier had I had someone to hold open the balloon for me. Instead, I had to try and finagle my fingers around and shove it in there quickly. Anyway, I eventually got it all in the balloon and then tied off the end. The end was a little long so I just cut the excess off.
I had so much fun squishing and playing with it after I was done that I know my son will just love it! See, that was pretty easy, huh?
Friday, July 28, 2017
Photography: Shapes
I think it's so fun to introduce photography to young children so of course I would come up with little projects to do with my 7-year-old son this summer. For this one, I came up with a simple concept of adding photography and geometry and taking pictures of shapes. First, I told him that we needed to make a list of 6 2D shapes. He came up with octagon, hexagon, circle, square, triangle, and rectangle. I thought this was a great starting point. Then, I gave him my phone and sent him off to look for these shapes around the house. He was easily able to find a circle, square, and rectangle. It was slightly more difficult to find a triangle, but he still found it on his own. The harder ones I had to help him with. But that's okay! So in the end, we made this cute little collage of our shapes!
Sunday, June 25, 2017
Kids Activity: Underwater Photography
Summer break has officially been here for about a month for us! And it feels like we haven't really done anything yet. So we're buckling down, and learning new things.
First on our list? Underwater Photography
I thought this would be a fun one to teach my little boy.
First, we talked about what underwater photography is. His Answer: When you take photos under the water.
I would say there is no simpler way to say it. He's right!
And what can you take pictures of under the water? His Answer: Fish, people swimming, plants
Right again! This is a lot easier than I thought it would be.
Now to the harder part. Can you come up with 3 ideas of pictures that we can take under water when we go to the pool later today? Well, this one took a little longer to answer and even took some pushing to get a full 3 ideas, but here they are:
1. Diving for toys
2. floating on your back
3. Spinning/flipping in the water
Now, I wasn't entirely sure how well we were going to execute all of these so there was a disclaimer I had to explain to him about how taking pictures under water is even harder than taking pictures on land so we might not get great pictures (especially since I was taking these pictures with my phone in a waterproof case).
Well, here goes nothing:
1. Diving for toys
2. floating on your back
3. spinning/flipping in the water
And there you have it. We learned a little something, made a plan, and tried to execute our plan. Overall, it was a great experience. I highly recommend doing this with your little ones.
First on our list? Underwater Photography
I thought this would be a fun one to teach my little boy.
First, we talked about what underwater photography is. His Answer: When you take photos under the water.
I would say there is no simpler way to say it. He's right!
And what can you take pictures of under the water? His Answer: Fish, people swimming, plants
Right again! This is a lot easier than I thought it would be.
Now to the harder part. Can you come up with 3 ideas of pictures that we can take under water when we go to the pool later today? Well, this one took a little longer to answer and even took some pushing to get a full 3 ideas, but here they are:
1. Diving for toys
2. floating on your back
3. Spinning/flipping in the water
Now, I wasn't entirely sure how well we were going to execute all of these so there was a disclaimer I had to explain to him about how taking pictures under water is even harder than taking pictures on land so we might not get great pictures (especially since I was taking these pictures with my phone in a waterproof case).
Well, here goes nothing:
1. Diving for toys
2. floating on your back
3. spinning/flipping in the water
And there you have it. We learned a little something, made a plan, and tried to execute our plan. Overall, it was a great experience. I highly recommend doing this with your little ones.
Subscribe to:
Posts (Atom)